How to create a password reset flow for your app.

Resetting a password is important to your application's security and usability. Without a doubt, your app users will sign up and then forget their password.
Nothing is worse than returning to the login page and getting rejected for a wrong password.
What password did I use again? Was there a 1 at the end? Or maybe an exclamation mark?
Well, forgetting your password and being unable to reset it is even worse.
Luckily for the builders out there, creating this flow isn't complicated and will ensure your users can self-serve and get back into your app. And what's better than that?
A note about OAuth
Before we get started, this entire article is a good reason for not asking users to sign up with their email and a password. If a user signs in with an identity provider like Google, Apple, or GitHub, you don't need to worry about these flows. If a user forgets their password, they reset it with the provider, not you. And you can still ask for the email during the signup flow.
Another option is to use a third-party provider like Auth0, which has these flows built in.
However, this isn't always practical or ideal. So, in those situations, you'll need to build this.
Overview
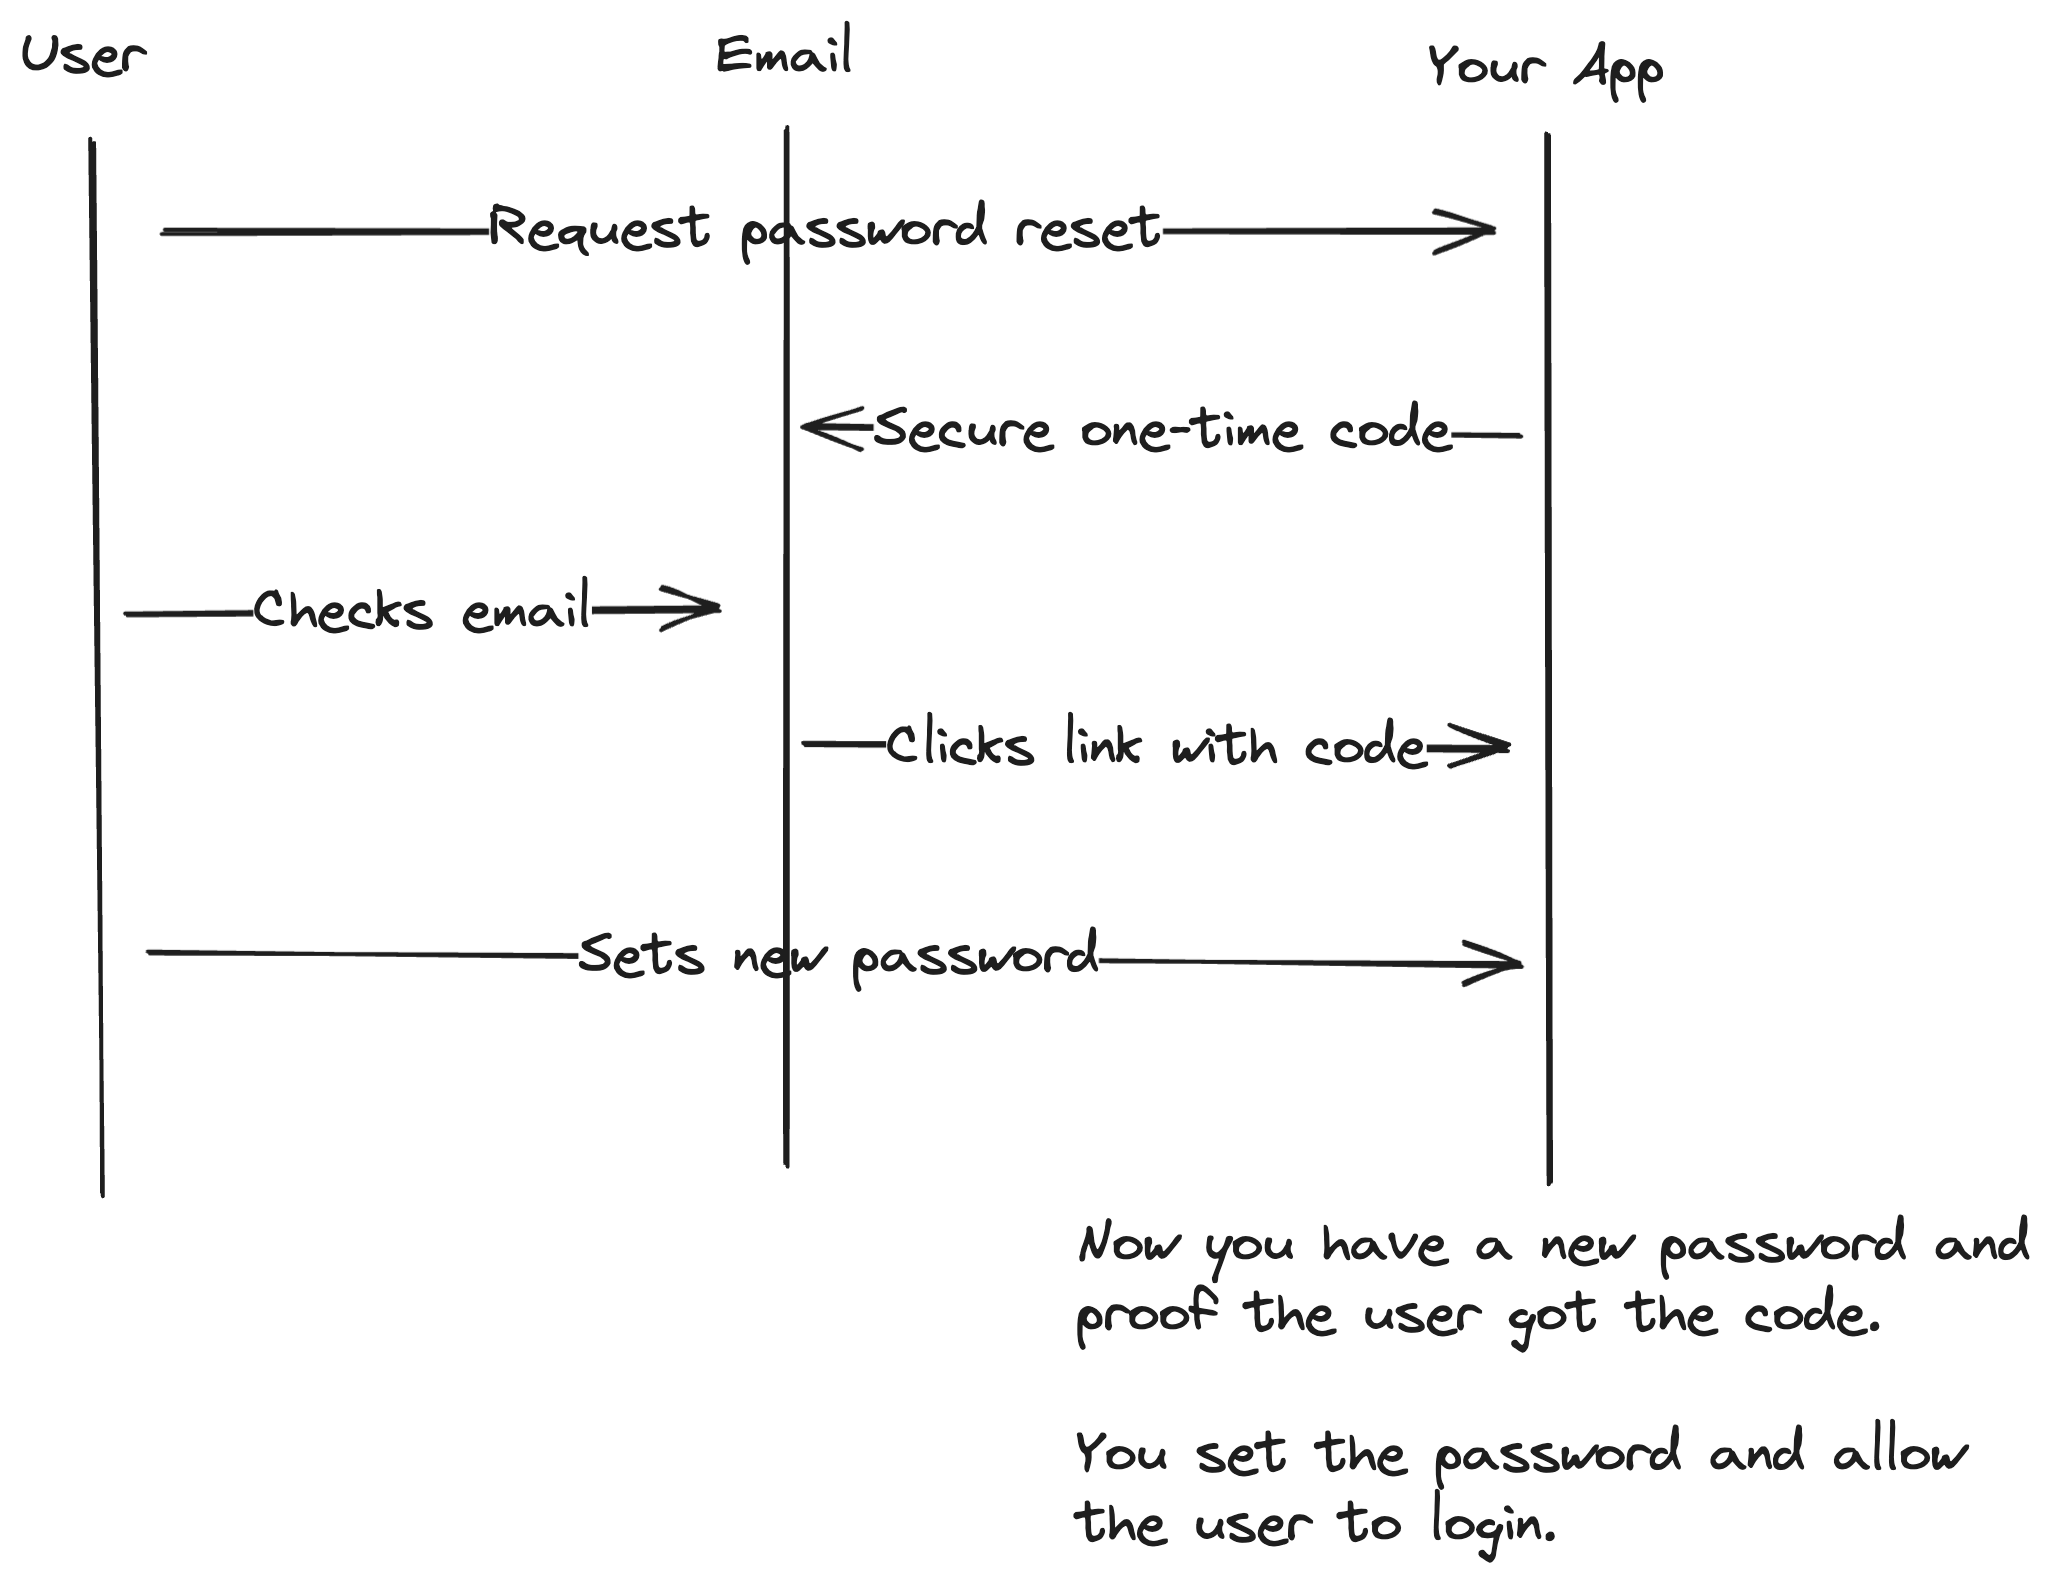
The flow isn't complicated for a password reset. You'll need the user's email and trust they have access to it. If they don't, or you didn't collect an email during signup (for example, just a username), then you have no way to send them a secure message.
Password reset works by assuming the user can access the email they signed up with. That email should be secure, and only that user can access it. Therefore, to reset the account with you, you confirm their access by sending a secure, one-time code to their email. The user proves they received that code, and therefore, they are who they say they are.
With that, let's run through an example using Next.js.
Example
This example was written with Next.js 13 using the app directory. It used Radix themes, Tailwind CSS, and Mailgun. You can find a link to the source at the bottom of the page.
Schema
When a user requests a password reset, save that token in your database. You can save it on the user record itself, but I suggest creating a new table instead. This will create an automatic audit trail of how many times a user has requested and reset their password.
model User {
  id                  Int                  @id @default(autoincrement())
  email               String               @unique
  password            String
  name                String?
  passwordResetTokens PasswordResetToken[]
}

model PasswordResetToken {
  id        Int       @id @default(autoincrement())
  token     String    @unique
  createdAt DateTime  @default(now())
  resetAt   DateTime?

  user   User @relation(fields: [userId], references: [id])
  userId Int
}
Prisma Schema Example
Request Reset Page
Create a page like /forgot-password in your app and have a form that asks the user to submit their email. This is the email you will send the password reset code to.
<Card className="gap-4 flex flex-col">
  <Flex gap="4" direction="column" asChild>
    <form action={submit}>
      <h1 className="text-2xl font-light">Reset password</h1>
      <p>
        Enter your email address to get instructions for resetting your
        password.
      </p>
      <TextField
        name="email"
        type="email"
        size="3"
        placeholder="Your email..."
      />
      <SubmitButton>Reset Password</SubmitButton>
      <Link href="/" className="text-sm text-neutral-700/80 flex items-center">
        <CaretLeftIcon />
        <span>Return to Login</span>
      </Link>
    </form>
  </Flex>
</Card>
When the user submits their request, you need to:
- Find the user in your database
- Create a record of the password reset in the database
- Create and send an email to the user with the unique code.
export async function resetPassword(data: FormData) {
  const email = data.get('email')
  if (!email || typeof email !== 'string') {
    return {
      error: 'Invalid email',
    }
  }

  const user = await prisma.user.findUnique({
    where: { email },
  })

  if (!user) {
    return {
      error: 'This email is not registered',
    }
  }

  const token = await prisma.passwordResetToken.create({
    data: {
      userId: user.id,
      token: `${randomUUID()}${randomUUID()}`.replace(/-/g, ''),
    },
  })

  const mailgun = new Mailgun(formData)
  const client = mailgun.client({ username: 'api', key: API_KEY })

  const messageData = {
    from: `Password Reset <security@${MAILGUN_DOMAIN}>`,
    to: user.email,
    subject: 'Reset Password Request',
    text: `Hello ${user.name}, someone (hopefully you) requested a password reset for this account. If you did want to reset your password, please click here: ${PROTOCOL}://${DOMAIN}/password-reset/${token.token}

For security reasons, this link is only valid for four hours.

If you did not request this reset, please ignore this email.`,
  }

  await client.messages.create(MAILGUN_DOMAIN, messageData)
  redirect('/forgot-password/success')
}
This example uses Mailgun to send the email, but any transaction service will do.
Handle Reset Request
The above email sends the token to the user's email as a link. When the user clicks on it, you show them a page where they can enter a new password. When submitted, validate everything is correct, and only then reset the password.
This form was located at /password-reset.
<Card className="gap-4 flex flex-col">
  <Flex gap="4" direction="column" asChild>
    <form action={submit}>
      <h1 className="text-2xl font-light">Choose a new password</h1>
      <p>You can reset your password here.</p>
      <TextField
        name="password"
        type="password"
        size="3"
        placeholder="Password"
      />
      <TextField
        name="confirm"
        type="password"
        size="3"
        placeholder="Confirm password"
      />
      {error && <p className="text-red-500 text-sm">{error}</p>}
      <SubmitButton>Reset Password</SubmitButton>
      <Link href="/" className="text-sm text-neutral-700/80 flex items-center">
        <CaretLeftIcon />
        <span>Return to Login</span>
      </Link>
    </form>
  </Flex>
</Card>
On the server, the validation needs to look at the token and the new password and ensure the token is valid, unused, and timely. The passwords need to match as well.
export async function resetPassword(token: string, data: FormData) {
  const password = data.get('password')
  const confirmPassword = data.get('confirm')
  if (
    !password ||
    typeof password !== 'string' ||
    password !== confirmPassword
  ) {
    return {
      error:
        'The passwords did not match. Please try retyping them and submitting again.',
    }
  }

  const passwordResetToken = await prisma.passwordResetToken.findUnique({
    where: {
      token,
      createdAt: { gt: new Date(Date.now() - 1000 * 60 * 60 * 4) },
      resetAt: null,
    },
  })

  if (!passwordResetToken) {
    return {
      error:
        'Invalid token reset request. Please try resetting your password again.',
    }
  }

  const encrypted = await hash(password, 12)

  const updateUser = prisma.user.update({
    where: { id: passwordResetToken.userId },
    data: {
      password: encrypted,
    },
  })

  const updateToken = prisma.passwordResetToken.update({
    where: {
      id: passwordResetToken.id,
    },
    data: {
      resetAt: new Date(),
    },
  })

  try {
    await prisma.$transaction([updateUser, updateToken])
  } catch (err) {
    console.error(err)
    return {
      error: `An unexpected error occured. Please try again and if the problem persists, contact support.`,
    }
  }
  redirect('/')
}
And now you have successfully reset the user's password!
Source Code
 a-bit-of-saas